SO EINFACH WAR SOCKEN STRICKEN NOCH NIE! INKL. YOUTUBE VIDEO

Heute möchte ich euch zeigen, wie ich schöne Basic Socken auf einer Brother Zweibett-Strickmaschine stricke.

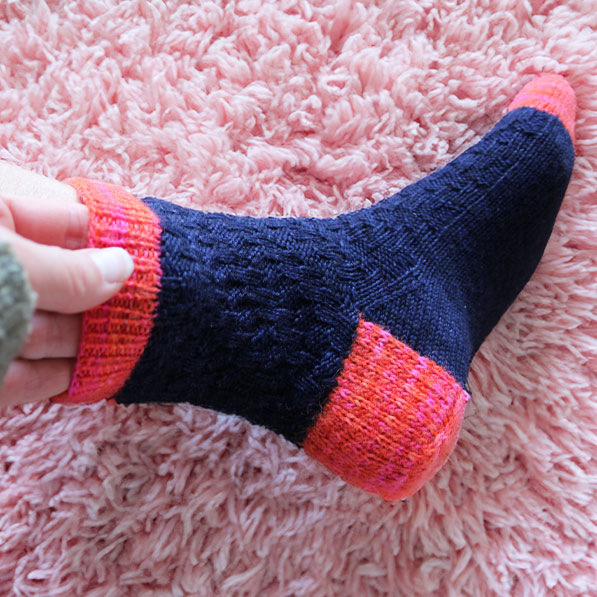
Ich arbeite in meinem aktuellen Video auf einer BROTHER KH860 + KR850. Für meine Socken verwende ich selbstgefärbte 4-fach Sockenwolle (75% Schurwolle, 25% Polyamid) mit Tweedfäden.
Kurzer Spoiler-Alarm: Strickmaschinen verstricken Tweed-Wolle nicht sehr gut, daher werde ich zukünftig auf diese Woll-Art verzichten. Diese Wolle bereitet einfach zu viele Probleme und sorgt dafür, dass das Maschinestricken kaum Freude bereitet.

In diesem Video stricke ich Socken in der Größe 39. Die Anleitung könnt ihr kostenlos als .pdf herunterladen.
Für den Anschlag (e-wrap) nehme ich insgesamt 64 Maschen in 1:1 in Arbeit.
Das 1:1 Bündchen stricke ich 40 Reihen mit T 3.2 .
Für den Schaft hänge ich rechts und links jeweils 16 Maschen nach hinten, so dass ich dann 32 Maschen vorne und 32 Maschen hinten auf den Betten liegen habe. Damit sich hier kein Löchlein bildet, verkreuze ich die „Knötchen“ der mittleren Maschen.
Den Schaft stricke ich 30 Runden in T 5.1 . Damit ich die Ferse stricken kann, senke ich das vordere Bett ab und tausche meinen Schlitten aus.
Die Ferse stricke ich mit verkürtzten Reihen mit einer Einteilung von 11/10/11 . Auch hier versuche ich Löchlein zu vermeiden, indem ich die „Knötchen“ der jeweils ausenliegenden Maschen miteinander zu verkreuzen.
Den Fuß stricke ich 130 Runden.
Die Spitze forme ich mit einem 2er-Decker. Dazu stricke ich 4 Runden zwischen den Abnahmen bis ich nur noch 16 Maschen übrig habe. Danach stricke ich nur noch 2 Runden zwischen den Abnahmen. Die letzten 4 Maschen hänge ich von vorne nach hinten und kette sie dann ab.
Zuletzt schließe ich das Bündchen mit einem Matratzenstich, vernähe alle losen Fäden und „repariere“ u.U. die kleinen Löchlein im Bereich zwischen Ferse und Fuß.
Doch, was schreibe ich hier?!?! Schaut euch doch einfach mein Video an. Darin zeige ich euch alles. Viel Spaß beim Zusehen!